
Building a garage is one of the most high-yield investments a property owner can make, but the transition from architectural drawings to physical lumber is where many projects falter. Evaluating whether to hire a professional crew or execute a self-build requires looking beyond simple step-by-step logs. It demands a deep understanding of structural math, local building codes, and physical safety parameters. This guide deconstructs the physical assembly of a garage skeleton so you can make highly informed construction and security decisions.
Complete Engineering Guide to Garage Framing and Assembly
Published: Aug 28, 2026
Custom vs. DIY Structural Garage Framing
Deciding between hiring a professional framing contractor or tackling a DIY build involves weighing clear financial and temporal trade-offs.
The Financial and Temporal Trade-offs
- Cost Dynamics: Professional framing averages $10 to $25 per square foot for materials and labor. A DIY approach reduces your structural expenses to $4 to $8 per square foot for materials alone.
- The Timeline Gap: While an experienced professional crew can frame a standard two-car garage in 2 weekends, an independent owner-builder typically takes 2 to 3 months—a 400% timeline extension. Use this formula to set realistic expectations:
Square Footage x 1.5 = Estimated DIY Framing Hours. - The Complexity Threshold: You should hire a professional team if your design features wall heights exceeding 10 feet, clear spans requiring custom steel I-beams, or complex structural integration with an existing home’s roofline.
Material Take-Off and Structural Supplies
To build a structurally sound assembly, you must secure heavy-duty, code-compliant framing supplies. This phase requires moving past standard big-box lumberyard run-of-the-mill choices to avoid major structural issues down the line.
Key Structural Materials
- Plates: Use pressure-treated lumber for sole plates in direct contact with concrete, paired with an elastomeric Sill Seal to prevent moisture wicking.
- Fasteners: High-durability structural hardware like Simpson Strong-Tie H2.5A hurricane ties are mandatory in wind and seismic zones.
- Nails: Deploy 21° or 30° framing nailers with hot-dipped galvanized nails to prevent corrosion.
Once your physical framing is completed, securing your structural access points is your next priority. Planning early for a proper door lock installation or learning how to install a deadbolt will safeguard the valuable tools and materials housed within your new workspace.
Standard Garage Framing Dimensions & Plate Layout Math
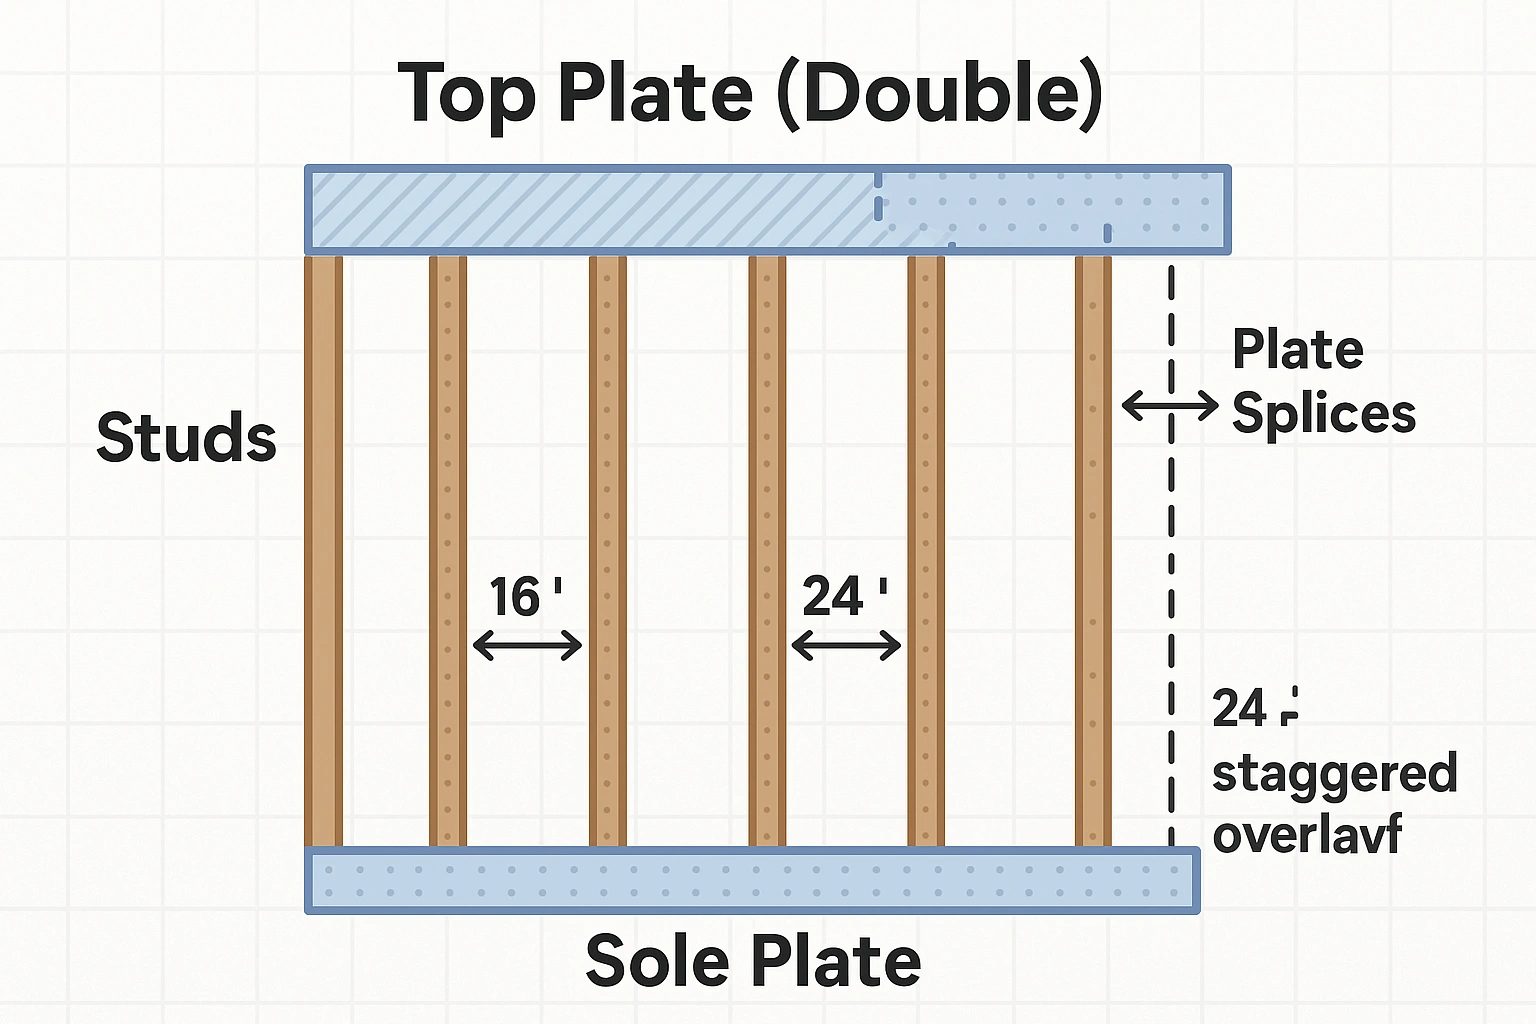
Achieving a perfectly square structure relies on layout precision on your concrete slab. You must measure, mark, and align your sole and top plates side-by-side using a snapped chalk line.
Crucial Framing Measurements
According to IRC Table R602.3(1):
- Sole-Plate-to-Stud Connection: Use 3-16d box nails (face-nailed) or 4-8d box nails (toe-nailed).
- Double Top Plate Splices: Joints must be offset by at least 24 inches and secured with 10d nails spaced at 12 inches on center (O.C.).
- Anchor Bolts: Must be at least 1/2″ in diameter, extending 7 inches into the concrete foundation, spaced no more than 6 feet apart, and positioned within 12 inches of any plate joint.
Always implement a “Long Wall / Short Wall” overlap strategy at corners to ensure rigid 90-degree framing connections.
Engineering the Openings: Headers, Jacks, and King Studs
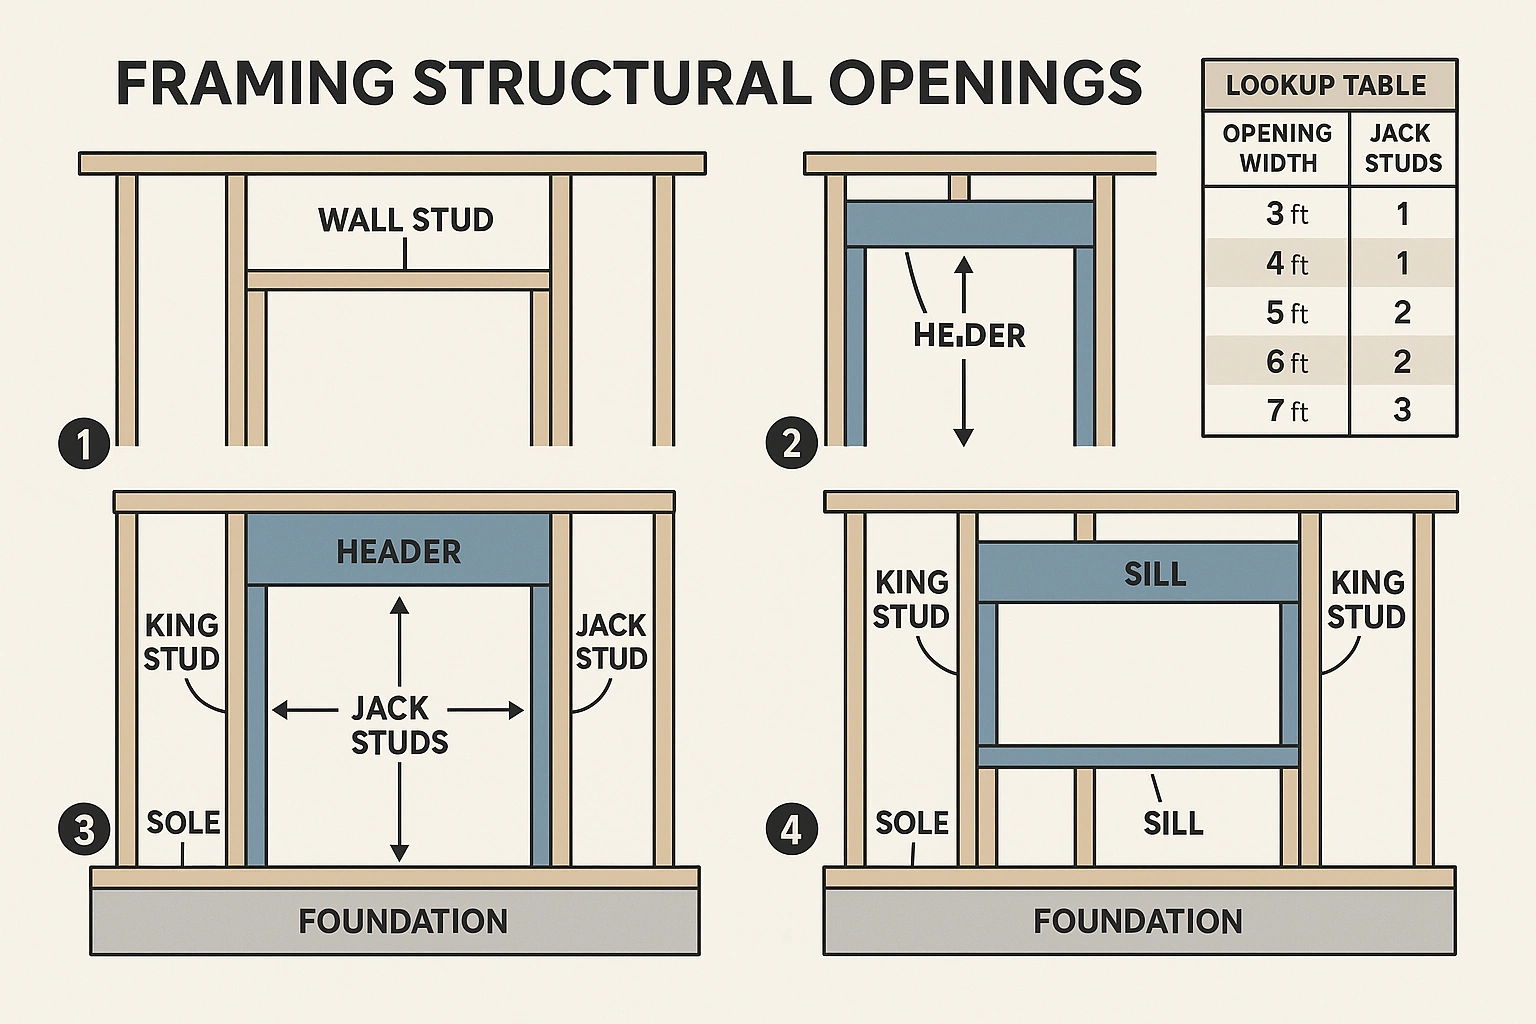
Large garage door openings introduce structural vulnerabilities. Gravity loads must be transferred safely around these openings down to the foundation.
Header and Support Mechanics
- Sizing Headers: A standard 16-foot double garage door requires engineered LVL (Laminated Veneer Lumber) headers rather than solid-sawn lumber to prevent sagging over time.
- Jack & King Studs: The wider the opening, the more jack (trimmer) studs you need to support the header. A door wider than 10 feet typically requires at least two jack studs on each side to transfer loads down safely.
- Overhead Clearance: Always design rough openings with a minimum of 12 inches of headroom clearance to accommodate standard overhead tracks and torsion spring systems.
For commercial applications, coordination is key. Arranging a professional commercial garage door installation ensures that heavy-duty tracks fit flush against your framing. Implementing robust commercial door hardware installation protocols during this phase will guarantee both long-term structural durability and tight site security.
Roof Assembly: Setting Trusses Safely Without a Crane
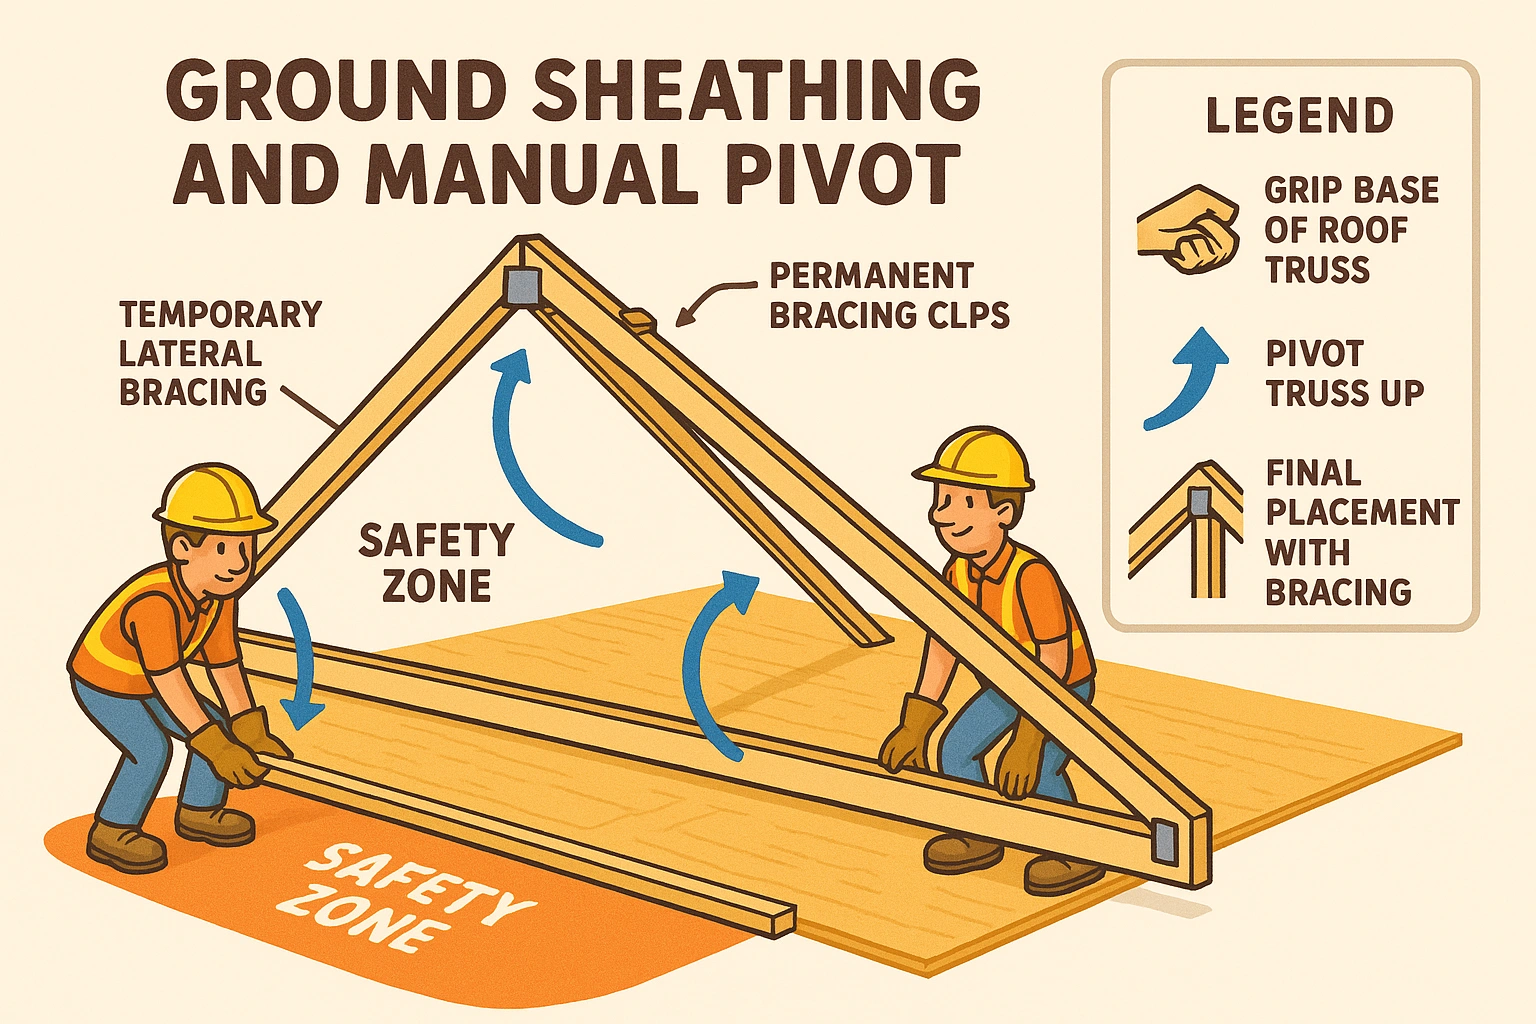
Setting roof trusses is one of the most physically demanding and dangerous steps of any garage build.
Truss Mechanics and Bracing
- The Hand-Pivot Method: For independent builders working without heavy machinery, the “upside-down swing method” involves lifting trusses onto the top plates upside down, then pivoting them 180 degrees into place using ropes and push poles.
- Bracing Requirements: Immediately install temporary lateral bracing across the trusses, followed by permanent diagonal bracing to withstand wind and seismic loads.
- Truss Options: Standard common trusses allow a completely clear-span floor area. However, upgrading to storage (attic) trusses increases material costs by 30% but recaptures up to 100% of the garage’s footprint for overhead storage.
Physical safety and property security go hand-in-hand. Once your roof is enclosed and doors are hung, understanding how to lock a garage door from inside or mastering how to lock a garage door securely from the outside will keep your new asset protected. For advanced security, integrate a modern proximity access control system during the rough-in wiring phase to secure your access points.
Frequently Asked Questions
What happens if I violate local IRC framing codes?
Violating structural building codes can lead to failed site inspections, costly tear-outs, and potential structural failures under load. Local inspectors strictly enforce fastening schedules, double top plate splice offsets, and anchor bolt layouts.
Should I choose stick-built framing or pre-fabricated trusses?
Pre-fabricated trusses are engineered for optimal strength-to-weight ratios and speed up roof construction significantly. Stick-built roofs require highly skilled calculations and precise physical cuts, which can add weeks of meticulous hand-framing for a solo builder.
How do I ensure my garage structure remains secure against intrusion?
Structural integrity is the foundation of security. Ensure your framing accommodates heavy-duty door frames, reinforced strike plates, robust lock mechanisms, and smart security systems right from the start.
Next Steps to Secure Your Build
A successful garage build marries structural strength with long-term security. Whether you decide to tackle the framing yourself or partner with trusted professionals, planning your security start at the physical framing phase. Connect with local security and entry specialists to select the ideal locks, hardware, and access control solutions to safeguard your completed structure.
Need more information? Get a free quote


