Diagnosing Mortise Lock Failure: Is It Your Cylinder or the Lockbody?


Published: Oct 1, 2026

When a high-security entry door or a classic historic door lock begins to stick, slip, or sag, it is easy to assume you need a complete, expensive replacement. However, mortise locks are highly modular, engineered systems. Before calling a technician or ordering replacement parts, you must isolate the failure. Is the issue a simple, easily corrected keyway malfunction, or has the heavy-duty cast-iron or steel lockcase (the lockbody) itself reached the end of its mechanical life?

By understanding the subtle mechanical signs of failure, you can make an informed decision, preserving historical hardware where possible and updating worn commercial mechanisms efficiently.
The 30-Second Diagnostic Protocol


To save time and money, locksmithing professionals use a systematic isolation process to separate cylinder issues from internal gear failures. Use this rapid diagnostic guide to pinpoint the root cause of your hardware issues before dismantling your door.

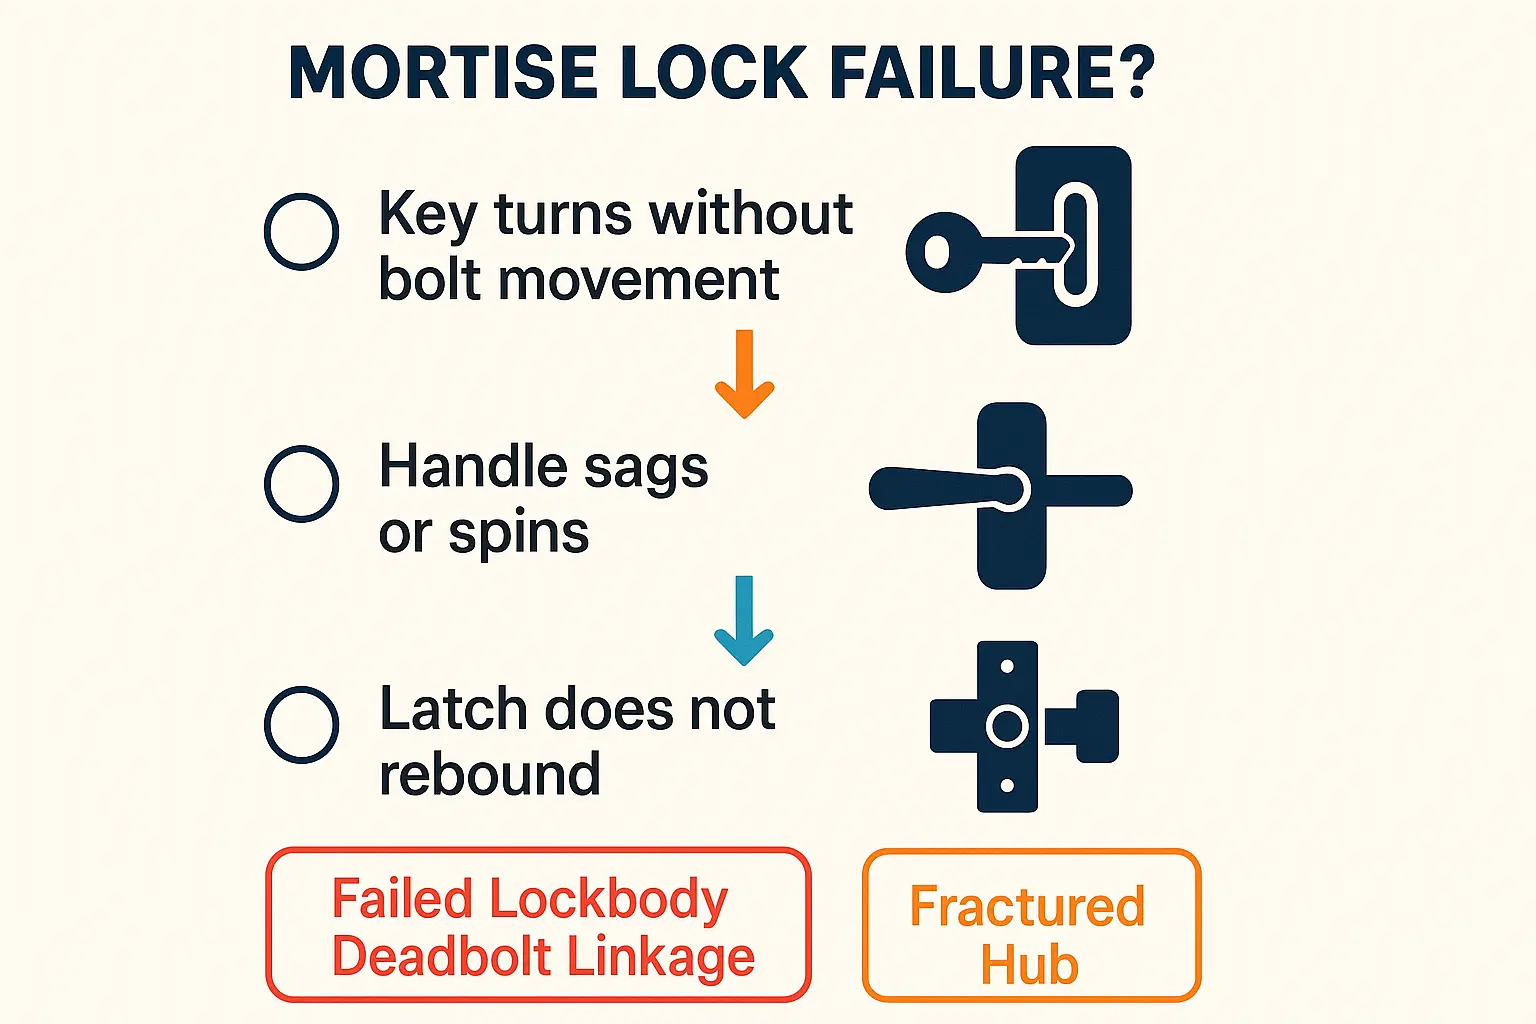
This flowchart acts as a rapid guide for users to isolate the cause of their mortise lock problems within 30 seconds, empowering quick decisions between lubricating, cylinder replacement, or full lockbody repair.

Understanding how the parts interact inside a door lock mechanism helps determine if the internal gears are stripped. If the latch fails to retract when turning the knob, but the cylinder operates smoothly, you are looking at an internal cassette failure.

Anatomy of a Failed Lockbody


A standard ANSI/BHMA Grade 1 mortise lock is designed to endure 1,000,000 operating cycles, while Grade 2 models are rated for 800,000. Entry-level residential lockbodies typically show signs of fatigue between 100,000 and 200,000 cycles (roughly 7 to 10 years of standard use). When these mechanical limits are reached, internal metals succumb to wear.

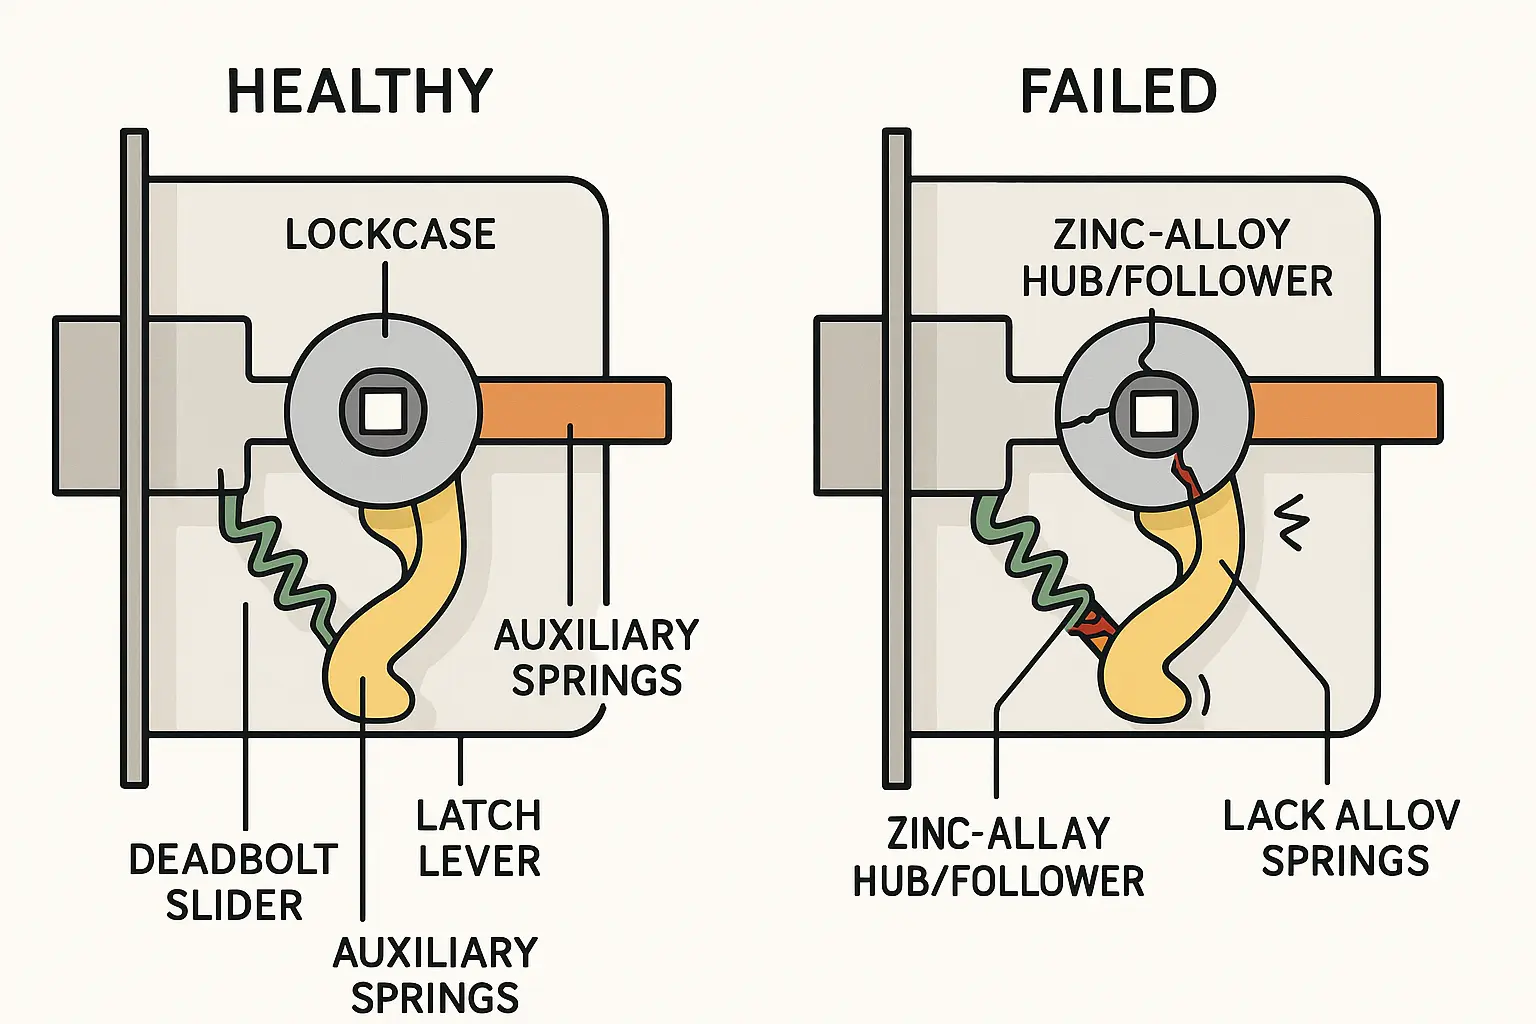
This diagram visually breaks down the internal components of a mortise lockbody and highlights common failure points like cracked zinc-alloy hubs and broken springs, clarifying mechanical reasons for lock malfunction.

Two primary metallurgical issues drive most mechanical failures inside the cassette:

  • Zamak-3 Alloy Fatigue: Modern lockset followers (the square hub where the spindle inserts) often use zinc-alloy castings. Heavy decorative brass levers increase rotational torque by up to 400% compared to standard knobs, accelerating fatigue and causing the hub to crack.
  • Spring Fracture: Flat leaf springs or heavy coil return springs undergo metal fatigue. When they snap, the entire latch or deadbolt linkage loses tension, leaving the hardware loose and unresponsive.

Five Definitive Signs Your Mortise Lockbody Has Failed


If you notice these progressive symptoms, it means the internal cassette needs repair or replacement rather than a simple lubrication job:

  1. The Drooping Lever: Levers should sit perfectly horizontal. If your handle sags, the internal spring has lost its tension or snapped.
  2. The Handle Spin: If the handle turns freely without resisting or retracting the latch, the square zinc-alloy hub has split inside.
  3. The Dead Key Phenomenon: If you turn the key, feel zero resistance, and the deadbolt remains retracted or thrown, the steel slider linkage has sheared off.
  4. Sticky Latch Rebound: If the latch stays inside the lockcase even after letting go of the handle, dust buildup or spring failure is preventing return.
  5. Orange Rust Weeping: This is a clear indicator that moisture has caused internal iron-oxide corrosion, swelling the steel casings and seizing the slider.

Addressing these broken locks early prevents stressful emergency structural lockouts.

The Cylinder vs. Lockbody Separation Test


Before purchasing replacement hardware, perform this diagnostic test to identify the exact failed part:

  1. Consult our guide on how to remove a door lock cylinder to safely extract the keyway.
  2. Once removed, insert your key into the cylinder and turn it.
  3. If the cam rotates smoothly in your hand, your cylinder is perfectly healthy. The issue lies entirely within the lockbody’s slider linkage.

If the cylinder is indeed seized, a straightforward door lock cylinder replacement will resolve the issue without needing to replace the expensive mortise box.

Sizing and Compatibility Blueprint


If the lockcase has failed, you must take precise measurements to avoid ordering incompatible hardware. Mortise locks are not universally sized.

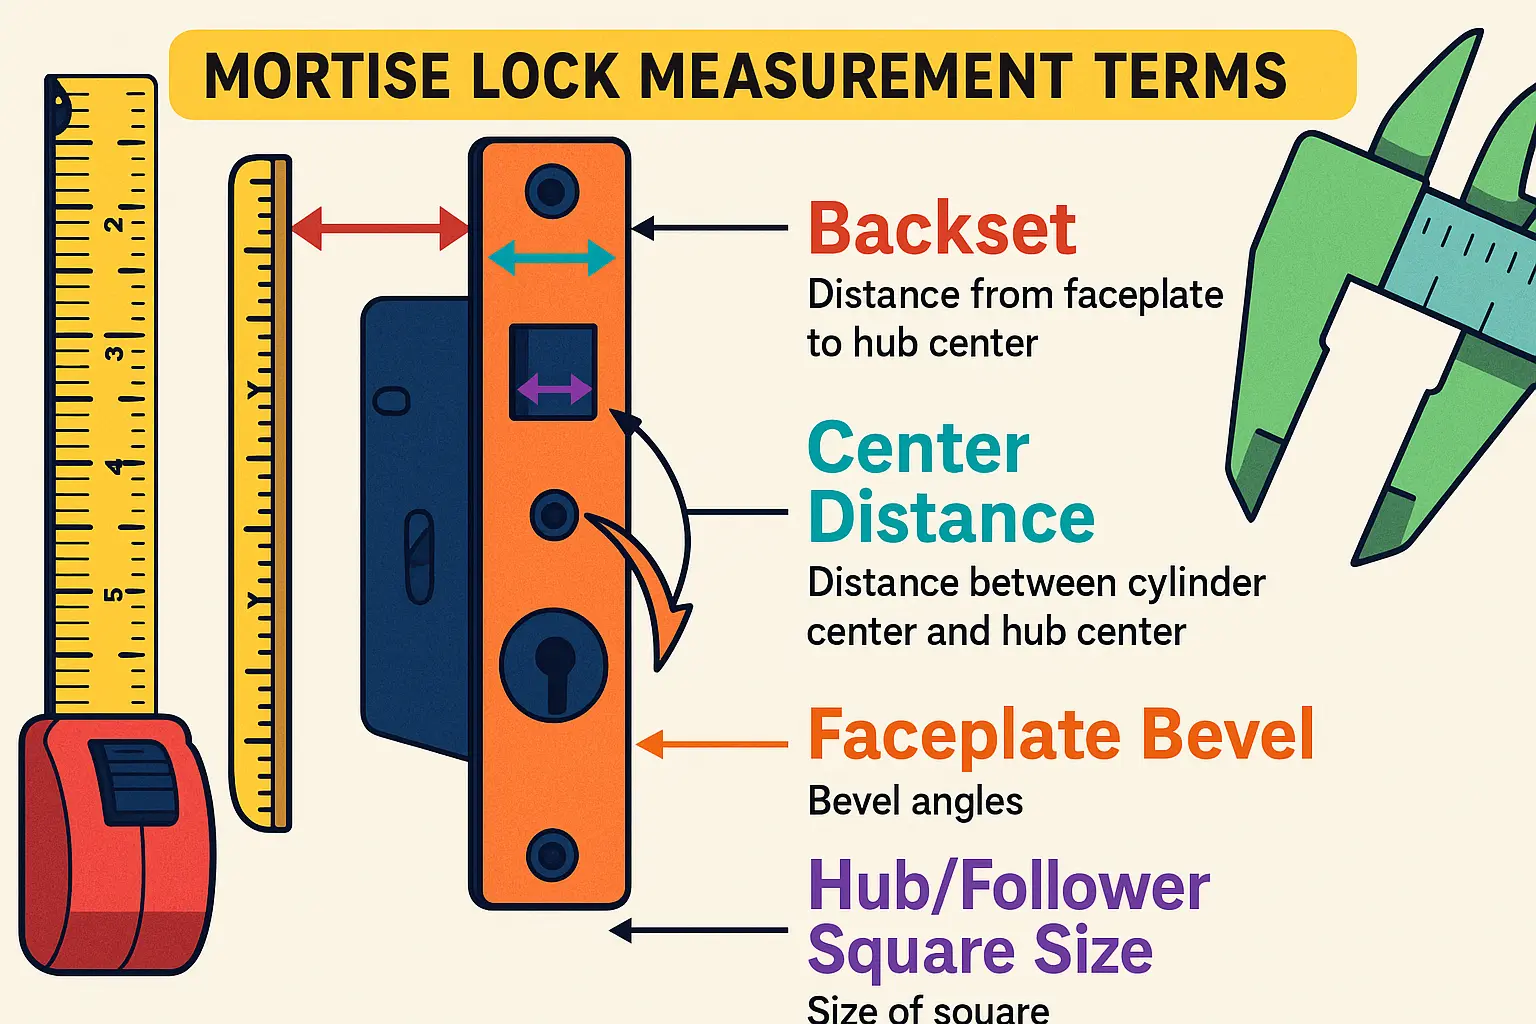
This diagram helps readers memorize and accurately measure critical mortise lock dimensions to avoid costly replacement errors and product returns.

Measure these three key metrics before purchasing:

  • Backset: The distance from the edge of the door faceplate to the center of the keyway or spindle hub.
  • Center Distance: The exact dimension between the center of the lever hub and the center of the lock cylinder.
  • Case Depth and Width: Ensure the replacement cassette fits the pre-existing pocket in your door.

Frequently Asked Questions


Can I spray WD-40 inside the keyhole to fix a sticking mortise lock?

No. WD-40 is a solvent, not a long-term lubricant. It attracts dust, dirt, and wood shavings over time, which gums up the delicate internal tolerances of the lockbody. Instead, use a dedicated dry graphite lubricant or a high-grade Teflon-based spray designed specifically for lock cylinders and gear linkages.

Is it better to repair an antique mortise lock or replace it entirely?

For historic brass and cast-iron locks, restoration is often the best path to preserve the home's character. These older locks can be disassembled, cleared of rust using electrolysis or vinegar baths, and re-greased. Modern mortise locks, particularly those with zinc alloy parts, are typically more cost-effective to replace once key components fail.

Why does my new door lever sag on my old mortise lock?

This usually happens when heavy modern levers are paired with an older lockcase designed for lightweight doorknobs. Old locksets lack the robust internal helper springs required to lift heavy, solid brass levers back to a horizontal position, causing the handle to sag prematurely.

Disassembling the Cassette Without a Spring Explosion


If you plan to inspect or clean an antique cast-iron lockcase, proceed with caution. Many historic cassettes contain heavily compressed springs under 15 to 25 pounds of tension.

  • Lay the lock body completely flat on a sturdy workbench.
  • Apply firm, downward pressure on the cover plate with your non-dominant palm.
  • Slowly back out the casing screws.
  • Gently lift the cover, keeping a finger on the main spring to prevent a “spring explosion.”

If the repair feels overwhelming or requires specialized parts, relying on a professional residential locksmith ensures your door’s structural integrity remains undamaged.

Need more information? Get a free quote

Call us now

Get A Free Call From Our Experts!

Floating Button Form